
所属分类:php教程

程序员必备接口测试调试工具:立即使用
Apipost = Postman + Swagger + Mock + Jmeter
Api设计、调试、文档、自动化测试工具
后端、前端、测试,同时在线协作,内容实时同步
【相关推荐:Python3视频教程 】
源码解释:
def namedtuple(typename, field_names, *, rename=False, defaults=None, module=None):
    """Returns a new subclass of tuple with named fields.
    >>> Point = namedtuple('Point', ['x', 'y'])
    >>> Point.__doc__                   # docstring for the new class
    'Point(x, y)'
    >>> p = Point(11, y=22)             # instantiate with positional args or keywords
    >>> p[0] + p[1]                     # indexable like a plain tuple
    33
    >>> x, y = p                        # unpack like a regular tuple
    >>> x, y
    (11, 22)
    >>> p.x + p.y                       # fields also accessible by name
    33
    >>> d = p._asdict()                 # convert to a dictionary
    >>> d['x']
    11
    >>> Point(**d)                      # convert from a dictionary
    Point(x=11, y=22)
    >>> p._replace(x=100)               # _replace() is like str.replace() but targets named fields
    Point(x=100, y=22)
    """
语法结构:
namedtuple(typename, field_names, *, rename=False, defaults=None, module=None)
命名元组,使得元组可像列表一样使用key访问(同时可以使用索引访问)。
collections.namedtuple 是一个工厂函数,它可以用来构建一个带字段名的元组和一个有名字的类.
创建一个具名元组需要两个参数,一个是类名,另一个是类的各个字段的名字。
存放在对应字段里的数据要以一串参数的形式传入到构造函数中(注意,元组的构造函数却只接受单一的可迭代对象)。
命名元组还有一些自己专有的属性。最有用的:类属性_fields、类方法 _make(iterable)和实例方法_asdict()。
示例代码1:
from collections import namedtuple

# 定义一个命名元祖city,City类,有name/country/population/coordinates四个字段
city = namedtuple('City', 'name country population coordinates')
tokyo = city('Tokyo', 'JP', 36.933, (35.689, 139.69))
print(tokyo)

# _fields 类属性,返回一个包含这个类所有字段名称的元组
print(city._fields)

# 定义一个命名元祖latLong,LatLong类,有lat/long两个字段
latLong = namedtuple('LatLong', 'lat long')
delhi_data = ('Delhi NCR', 'IN', 21.935, latLong(28.618, 77.208))

# 用 _make() 通过接受一个可迭代对象来生成这个类的一个实例,作用跟City(*delhi_data)相同
delhi = city._make(delhi_data)

# _asdict() 把具名元组以 collections.OrderedDict 的形式返回,可以利用它来把元组里的信息友好地呈现出来。
print(delhi._asdict())
运行结果:

示例代码2:
from collections import namedtuple

Person = namedtuple('Person', ['age', 'height', 'name'])
data2 = [Person(10, 1.4, 'xiaoming'), Person(12, 1.5, 'xiaohong')]
print(data2)

res = data2[0].age
print(res)

res2 = data2[1].name
print(res2)
运行结果:

示例代码3:
from collections import namedtuple
card = namedtuple('Card', ['rank', 'suit'])  # 定义一个命名元祖card,Card类,有rank和suit两个字段
class FrenchDeck(object):
    ranks = [str(n) for n in range(2, 5)] + list('XYZ')
    suits = 'AA BB CC DD'.split()  # 生成一个列表,用空格将字符串分隔成列表

    def __init__(self):
        # 生成一个命名元组组成的列表,将suits、ranks两个列表的元素分别作为命名元组rank、suit的值。
        self._cards = [card(rank, suit) for suit in self.suits for rank in self.ranks]
        print(self._cards)

    # 获取列表的长度
    def __len__(self):
        return len(self._cards)
    # 根据索引取值
    def __getitem__(self, item):
        return self._cards[item]
f = FrenchDeck()
print(f.__len__())
print(f.__getitem__(3))
运行结果:

示例代码4:
from collections import namedtuple

person = namedtuple('Person', ['first_name', 'last_name'])

p1 = person('san', 'zhang')
print(p1)
print('first item is:', (p1.first_name, p1[0]))
print('second item is', (p1.last_name, p1[1]))
运行结果:

示例代码5: 【_make 从存在的序列或迭代创建实例】
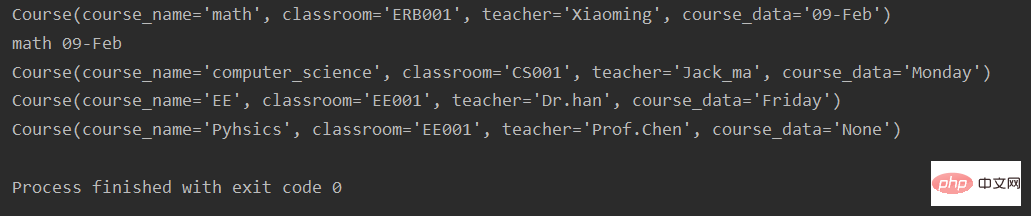
from collections import namedtuple
course = namedtuple('Course', ['course_name', 'classroom', 'teacher', 'course_data'])
math = course('math', 'ERB001', 'Xiaoming', '09-Feb')
print(math)
print(math.course_name, math.course_data)
course_list = [
    ('computer_science', 'CS001', 'Jack_ma', 'Monday'),
    ('EE', 'EE001', 'Dr.han', 'Friday'),
    ('Pyhsics', 'EE001', 'Prof.Chen', 'None')
]
for k in course_list:
    course_i = course._make(k)
    print(course_i)
运行结果:
示例代码6: 【_asdict 返回一个新的ordereddict,将字段名称映射到对应的值】
from collections import namedtuple
person = namedtuple('Person', ['first_name', 'last_name'])
zhang_san = ('Zhang', 'San')
p = person._make(zhang_san)
print(p)
# 返回的类型不是dict,而是orderedDict
print(p._asdict())
运行结果:

示例代码7: 【_replace 返回一个新的实例,并将指定域替换为新的值】
from collections import namedtuple
person = namedtuple('Person', ['first_name', 'last_name'])
zhang_san = ('Zhang', 'San')
p = person._make(zhang_san)
print(p)
p_replace = p._replace(first_name='Wang')
print(p_replace)
print(p)
p_replace2 = p_replace._replace(first_name='Dong')
print(p_replace2)
运行结果:

示例代码8: 【_fields 返回字段名】
from collections import namedtuple
person = namedtuple('Person', ['first_name', 'last_name'])
zhang_san = ('Zhang', 'San')
p = person._make(zhang_san)
print(p)
print(p._fields)
运行结果:

示例代码9: 【利用fields可以将两个namedtuple组合在一起】
from collections import namedtuple
person = namedtuple('Person', ['first_name', 'last_name'])
print(person._fields)
degree = namedtuple('Degree', 'major degree_class')
print(degree._fields)
person_with_degree = namedtuple('person_with_degree', person._fields + degree._fields)
print(person_with_degree._fields)
zhang_san = person_with_degree('san', 'zhang', 'cs', 'master')
print(zhang_san)
运行结果:

示例代码10: 【field_defaults】
from collections import namedtuple
person = namedtuple('Person', ['first_name', 'last_name'], defaults=['san'])
print(person._fields)
print(person._field_defaults)
print(person('zhang'))
print(person('Li', 'si'))
运行结果:

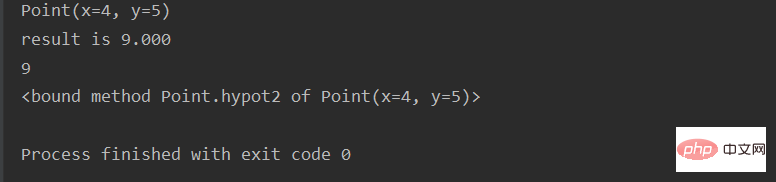
示例代码11: 【namedtuple是一个类,所以可以通过子类更改功能】
from collections import namedtuple
Point = namedtuple('Point', ['x', 'y'])
p = Point(4, 5)
print(p)
class Point(namedtuple('Point', ['x', 'y'])):
    __slots__ = ()

    @property
    def hypot(self):
        return self.x + self.y
    def hypot2(self):
        return self.x + self.y
    def __str__(self):
        return 'result is %.3f' % (self.x + self.y)
aa = Point(4, 5)
print(aa)
print(aa.hypot)
print(aa.hypot2)
运行结果:
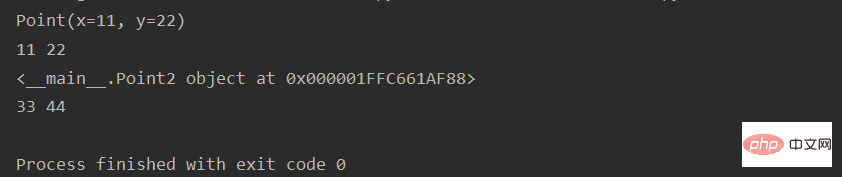
示例代码12: 【注意观察两种写法的不同】
from collections import namedtuple

Point = namedtuple("Point", ["x", "y"])
p = Point(11, 22)
print(p)
print(p.x, p.y)

# namedtuple本质上等于下面写法
class Point2(object):
    def __init__(self, x, y):
        self.x = x
        self.y = y
o = Point2(33, 44)
print(o)
print(o.x, o.y)
运行结果:
【相关推荐:Python3视频教程 】
以上就是python解析之namedtuple函数的用法的详细内容,更多请关注zzsucai.com其它相关文章!