

所属分类:web前端开发

“扁平化CMS设计”网络服务器已经成为一种趋势。这仅指不将其信息存储在数据库中的内容管理系统(CMS)。相反,所有信息都存储在纯文本文件中。由于现在许多虚拟专用服务器 (VPS) 都使用基于 RAM 的硬盘驱动器,因此这种方法更快、更安全。
在本系列教程中,我将向您展示如何使用一些标准 Web 技术创建您自己的平面文件系统 CMS。这些系统的功能不像其他系统那么齐全,但具有良好的响应时间的基础知识。
由于硬盘驱动器上有所有信息,文件组织成为一个大问题。考虑到这一点,站点信息将位于与样式和布局信息不同的目录中。此外,每种类型的页面在站点文件夹下都有自己的目录,其中包含 CMS 的小部分的部件目录。这使得所有东西都在自己的位置上并形成一个灵活的系统。
在要构建项目的目录中,创建以下目录:src、site 和 themes。 src 目录将包含服务器代码,site 目录用于存储所有站点信息,themes 目录用于存储布局和主题信息.
在themes目录中,需要制作layouts和styling目录。 layouts 目录将包含不同的网页布局。通过将布局信息与样式信息分离,主题变得更加灵活。目前,将有一种名为 SingleCol 的布局。
对于所有样式和布局创建,我使用 Sass、Compass 和 Susy。 Sass 是一种自定义样式表处理语言。它提供了一种更强大的方法来为您的网站创建 CSS 样式表。 Compass 是 Sass 的扩展。 Sassy-buttons 是一个 Sass 扩展,用于在网站上制作漂亮的按钮。 Susy 也是为您的网站创建网格布局系统的扩展。
由于 Ruby 已预安装在所有 Mac 上,因此您无需安装它。要在 Windows 系统上安装 Ruby,您需要下载 Ruby 的 Windows Installer。在 Linux 上,您需要使用系统的包管理器来安装 Ruby。
一旦系统上安装了 Ruby,您就可以使用以下命令行安装 Sass、Compass、Sassy-buttons 和 Susy:
gem install sass
gem install sassy-buttons
gem install compass
gem install susy
在本教程中,我使用 Sass 3.4.16、Sassy-buttons 0.2.6、Compass 1.0.3 和 Susy 2.2.5。根据您的系统配置,您可能必须在运行这些命令之前加上 sudo。
要开始创建布局,请在 SingleCol 目录中运行以下命令:
compass init
这将创建 sass 和 stylesheets 目录,以及一个名为 config.rb 的文件。由于我喜欢使用 css 作为样式表目录,因此将 stylesheets 目录重命名为 css。另外,为布局所需的任何 JavaScript 文件创建一个 js 目录。打开 config.rb 文件并使其如下所示:
require 'susy'
http_path = "/"
css_dir = "css"
sass_dir = "sass"
images_dir = "images"
javascripts_dir = "js"
现在,要创建网站的基本布局,请在 layout 目录中创建一个名为 template.html 的文件。在此文件中,添加以下代码:
		{{{title}}}


	{{{head}}}


				{{{header}}}


				{{{navbar}}}


			{{{sidebar}}}


			{{{content}}}


			{{{footer}}}
此模板为网站创建一个标准网页。每个页面都有一个带有导航栏的页眉、一个侧边栏、一个内容区域和一个页脚区域。最后加载的是网站所需的 JavaScript。
每个部分都用一个 Handlebar 宏表示。服务器在将宏提供给用户之前对其进行扩展。
在 sass 目录中,创建一个名为 base.scss 的文件并放置以下代码:
@import 'compass/reset';
@import 'susy';

$susy: (
  flow: ltr,
  math: fluid,
  output: float,
  gutter-position: after,
  container: auto,
  container-position: center,
  columns: 16,
  gutters: .25,
  column-width: false,
  global-box-sizing: content-box,
  last-flow: to,
  debug: (
    image: hide,
    color: rgba(#66f, .25),
    output: background,
    toggle: top right,
  ),
  use-custom: (
    background-image: true,
    background-options: false,
    box-sizing: true,
    clearfix: false,
    rem: true,
  )
);

body {
}

#wrap {
  @include container(16);
  width: 1024px;
  display:  block;
}

#headerwrap {
  @include span(16 of 16);
  margin-bottom: 20px;
}

#header {
  margin-top: 20px;
  margin-left: auto;
  margin-right: auto;
  width:    95%;
}

#content {
    @include span(11 of 16);
 }

.col1 {
    @include span(5 of 10);
}

.col2 {
    @include span(last 5 of 10);
}

#footer .col2 {
    width: auto;
}

.box {
  @include span(4 of 10);
}

#sidebar {
  @include span(last 4 of 16);
}

#footer {
  @include span(16 of 16);
}

/** CSS dropdown menu **/

#navigation  {
  margin-top: 20px;
  margin-left: auto;
  margin-right: auto;
  width:    95%;
}

#menuh-container {
  top: 1em;
  left: 1em;
  display: inline;
  width: 100%;
}

#menuh {
  margin-top: 1em;
  display: inline;
  width: 100%;
}

#menuh ul li {
  display: inline-block;
  width: fit-content;
}

#menuh a
  {
  text-align: center;
  display:block;
  white-space:nowrap;
  margin:0;
  padding: 5px;
  text-decoration: none;
  }

#menuh ul
  {
  list-style:none;
  margin: 0px 20px 0px 20px;
  padding: 0px;
  }

#menuh li
  {
  position:relative;
  min-height: 1px;
  vertical-align: bottom;
  width: fit-content;
  }

#menuh ul ul
  {
  position:  absolute;
  z-index:  500;
  top: 50px;
  left: 20px;
  display:  none;
  padding: 0.5em;
  margin:  -1em 0 0 -1em;
  }

  #menuh ul ul li {
    width: 100%;
  }

#menuh ul ul li  a {
    text-align:  left;
}

#menuh ul ul ul
  {
  left: 90px;
  }

div#menuh li:hover
  {
  cursor:pointer;
  z-index:100;
  }

div#menuh li:hover ul ul,
div#menuh li li:hover ul ul,
div#menuh li li li:hover ul ul,
div#menuh li li li li:hover ul ul
{display:none;}

div#menuh li:hover ul,
div#menuh li li:hover ul,
div#menuh li li li:hover ul,
div#menuh li li li li:hover ul
{display:block;}

/* End CSS Drop Down Menu */
此sass代码加载到罗盘重置样式中以中和浏览器默认值。然后它加载并设置susy,以便为网页的所有元素创建正确的网格布局。
css导航系统位于页面定义之后。通过将鼠标悬停在定义上,隐藏的菜单下拉菜单将变得可见。这提供了一个仅 css 的菜单系统。
所有这些样式都定义了网站的基本结构。这里没有什么可以创建页面的外观,只是它的位置。所有样式均由样式内容处理。
对于styling目录,创建一个名为Basic的目录。初始化 sass 信息,就像对 layouts/SingleCol 目录所做的那样。在此目录中,运行以下命令行:
compass init
这将创建 sass 和 stylesheets 目录,以及一个名为 config.rb 的文件。由于我喜欢使用 css 作为样式表目录,因此将 stylesheets 目录重命名为 css。另外,为任何用于创建主题的 JavaScript 创建一个 js 目录。打开 config.rb 文件并使其如下所示:
require 'sassy-buttons'
http_path = "/"
css_dir = "css"
sass_dir = "sass"
images_dir = "images"
javascripts_dir = "js"
对于网站上的按钮样式,我喜欢使用sassy-buttons。因此,首先需要它,然后是目录结构。
在 Basic/sass 目录中,使用以下信息创建 Basic.scss 文件:
// Welcome to Compass.
// In this file you should write your main styles. (or centralize your imports)
// Import this file using the following HTML or equivalent:
//
//
@import 'compass/css3';
@import 'sassy-buttons';

$style-color1: rgb(247, 237, 222);
$style-color2: #ffedd1;
$style-color3: rgb(245, 213, 166);
$style-color4: #f0d5ad;

//
// Clear Fix
//
.clearfix:after {
    content: '.';
    display: block;
    clear: both;
    visibility: hidden;
    line-height: 0;
    height: 0;
}

.clearfix {
    display: inline-block;
}

html[xmlns] .clearfix {
    display: block;
}

* html .clearfix {
    height: 1%;
}

//
// Main Styling for Wood.
//
@mixin standardsize {
    padding-top: 10px;
    padding-left: 15px;
    font-size: 19px;
    line-height: 1.25em;
}

body {
    background-color: $style-color2;

    input[type='button'] {
        @include sassy-button('shiny', 10px, 16px, $style-color1, darken($style-color1, 20%), #000, bold);
    }

    .button {
        @include sassy-button('shiny', 10px, 16px, $style-color1, darken($style-color1, 20%), #000, bold);
        display: inherit;
        margin-left: auto;
        margin-right: auto;
        margin-top: 10px;
        margin-bottom: 10px;
        text-align: center;
    }

    #wrap {
        background-color: $style-color1;
        @include border-radius(.6em, .6em);
        margin-top: 10px;
        margin-bottom: 10px;
        border: 4px solid $style-color4;

        #header {
            background-color: $style-color2;
            @include border-radius(15px);
            background-repeat: no-repeat;
            border: 2px solid $style-color3;
            height: 130px;
            text-align: left;
            margin-top: 20px;
            font-size: 3em;

            h1 {
                a:link, a:visited {
                    color: #000;
                    text-decoration: none;
                }
                padding-top: 40px;
                padding-left: 20px;
            }
            h6 {
                font-size: .4em;
                font-style: italic;
                padding-left: 20px;
            }
        }
        #sidebar {
            background-color: $style-color2;
            @include border-radius(.6em, .6em);
            padding: .6em;
            vertical-align: text-top;
            overflow: hidden;
            margin-right: .5em;
            border: 2px solid $style-color3;
            hr {
                color: $style-color2;
                background-color: $style-color2;
            }
            p, ul, li {
                @include standardsize;
            }
            ul li {
                list-style-type: disc;
                margin-left: 25px;
                padding: 0;
                border: 0;
                outline: 0;
                font-size: 100%;
                vertical-align: baseline;
                background: transparent;
            }
            li {
                margin-bottom: 10px;
            }
            h1, h2, h3, h4, h5, h6 {
                @include standardsize;
                font-weight: bold;
                margin-top: .25em;
                margin-bottom: .25em;
            }
            h1 {
                font-size: 2.5em;
            }
            h2 {
                font-size: 2em;
            }
            h3 {
                font-size: 1.5em;
            }
            h4 {
                font-size: 1em;
            }
            h5 {
                font-size: .8em;
            }
            h6 {
                font-size: .6em;
            }
            input[type='button'] {
                margin-left: 120px;
                clear: both;
            }
        }
        #content {
            input[type='button'] {
                margin-left: 200px;
                clear: both;
            }
            h1, h2, h3, h4, h5, h6 {
                @include standardsize;
                font-weight: bold;
                margin-top: .25em;
                margin-bottom: .25em;
            }
            h1 {
                font-size: 2.5em;
            }
            h2 {
                font-size: 2em;
            }
            h3 {
                font-size: 1.5em;
            }
            h4 {
                font-size: 1em;
            }
            h5 {
                font-size: .8em;
            }
            h6 {
                font-size: .6em;
            }
            hr {
                margin-top: 30px;
                margin-bottom: 30px;
            }
            p, ul, li, details, summary, pre {
                @include standardsize;
            }
            details {
                p, pre {
                    margin-left: 25px;
                }
            }
            ul li {
                list-style-type: disc;
                margin-left: 25px;
                padding: 0;
                border: 0;
                outline: 0;
                font-size: 100%;
                vertical-align: baseline;
                background: transparent;
            }
            li {
                margin-bottom: 10px;
            }
            .box {
                clear: both;
                background-color: $style-color4;
                float: none;
                margin-left: auto;
                margin-right: auto;
                margin-top: 1.0em;
                margin-bottom: 1em;
                @include border-radius(.6em, .6em);
                display: block;
                padding: .5em;
            }
            img {
                @include border-radius(10px);
                margin: 20px auto 20px auto;
            }
        }
        #footer {
            border-top: 5px;
            border-style: solid;
            border-color: $style-color3;
            @include border-radius(.6em, .6em);
            margin-top: 30px;
            p {
                margin-bottom: .6em;
                @include standardsize;
                margin-right: 15px;
            }
        }
    }
}

// CSS dropdown menu
#navigation {
    text-align: left;
    border: 2px solid $style-color3;
    background-color: $style-color2;
    @include border-radius(15px);
}

#menuh {
    font-size: 1.3em;
    font-family: arial, helvetica, sans-serif;
    background-color: $style-color1;
}

#menuh ul {
    background-color: $style-color2;
}

#menuh ul ul {
    background-color: $style-color2;
    @include border-radius(15px);
    border: 2px solid $style-color3;
}

#menuh a {
    background-color: $style-color2;
    color: #000;
}

#menuh a:link, #menuh a:visited, #menuh a:active {
    color: #000;
    background-color: $style-color2;
}

#menuh a:hover {
    color: #000;
    background-color: $style-color4;
    @include border-radius(5px);
}

// End CSS Drop Down Menu
// Misc classes
.picture {
    border: 3px solid $style-color3;
    @include border-radius(8px);
    float: left;
    margin: 5px 15px 15px 15px;
}

a:link, a:visited {
    color: darken($style-color1, 50);
    text-decoration: none;
}

strong {
    font-weight: bold;
}

table {
    margin: 20px;
    border: 3px solid;
    @include border-radius(10px);
    border-color: lighten($style-color2, 6);
    th {
        text-align: center;
        font-weight: bold;
        padding: 10px 0 10px 0;
    }
    tbody {
        td {
            padding: 10px;
        }
        tr:nth-child(2n+1) {
            background-color: darken($style-color2, 5);
        }
        tr:nth-child(even) {
            background-color: lighten($style-color2, 2.5);
        }
    }
}

#commentSpacer {
    width: 100%;
    margin-top: 20px;
    margin-left: 15px;
}

.tutorial_excerpt {
    margin-left: 20px;
}

.tutorial_thumbnail {
    float: left;
    margin-right: 20px;
    margin-left: 20px;
    margin-bottom: 20px;
}

.tutorial_wrap {
    margin-bottom: 50px;
    float: left;
}

img.wp-post-image {
    -moz-border-radius: 15px;
    border-radius: 15px;
    box-shadow: 10px 10px 5px gray;
}

.showcode {
    margin: 20px auto 20px 30px;
    -moz-border-radius: 15px;
    border-radius: 15px;
    border: $style-color4 3px;
    border-style: solid;
    background: white;
}

#socialmedia {
    width: 700px;
    margin-top: 20px;
    margin-left: 15px;
}

#socialbuttons {
    margin: auto;
}

#socialbuttons a {
    opacity: 0.8;
    filter: alpha(opacity = 80);
    -webkit-transition: all ease-in-out 0.2s;
    -moz-transition: all ease-in-out 0.2s;
    -ms-transition: all ease-in-out 0.2s;
    -o-transition: all ease-in-out 0.2s;
    transition: all ease-in-out 0.2s;
}

#socialbuttons a:hover {
    opacity: 1;
    filter: alpha(opacity = 100);
}

#socialbuttons a {
    display: inline-block;
    height: 28px;
    width: 30px;
    background-image: url(/images/ico-subscribe-social.png);
    background-repeat: no-repeat;
}

#socialbuttons a.twitter {
    background-position: -30px 0;
}

#socialbuttons a.facebook {
    background-position: -60px 0;
}

#socialbuttons a.googleplus {
    background-position: -210px 0;
}

dl {
    margin-left: 20px;
    margin-top: 20px;
    margin-bottom: 20px;
    font-size: 19px;
    line-height: 1.25em;
}

dt {
    margin-left: 20px;
    margin-bottom: 20px;
    font-weight: bold;
}

dd {
    margin-left: 40px;
    margin-bottom: 20px;
}
此代码定义网站的外观。它定义了构成典型网站样式的背景、颜色、字体等。
styling/Basic 目录包含网站 404 页面、页眉、页脚和侧边栏部分的默认外观所需的文件。因此,创建一个名为 404.html 的文件并放置以下代码:
404 Page

Sorry, we could not find the page.
这是一个基本的 404 错误页面。您必须小心此处提供的信息,因为您不想透露太多有关您的网站如何运作的信息。由于它将被放置在页面的内容区域中,因此用户可以轻松地离开它。
接下来,创建包含以下内容的 header.html 文件:
Test Site
A New Approach
这只是一个非描述性的基本标头,但它为 CMS 提供了一些可显示的内容。
接下来,使用以下内容创建 footer.html 文件:
<footer>
[Column1]
    <p>Copyrighted 2012 by <a href="{{{WebAddress}}}/">Your Company</a>
[/Column1]
[Column2]
	<p>Running on a flat CMS server!</p>
[/Column2]
</footer>
接下来,使用以下内容创建 sidebar.html 文件:
A Sidebar
This is a basic sidebar that can have other times.
同样,这些是占位符。所有这些文件都被复制到 site/parts 目录中,并根据站点的需要进行更改。这些放在这里是为了让服务器有一些带有它们名称的东西可以在服务器中使用,以防用户忘记创建它们。
定义了主题和布局后,就可以为实际网站创建基本内容和结构了。在网站目录中,创建部分、页面、帖子、图像、 css、js 目录。
parts 目录将包含 html/css/javascript 的小片段,这些片段将使单个单元放置在网站的多个位置。这些部分将加载到服务器中并根据需要与页面内容组合。对于我们的演示网站,创建以下部分:
<footer>
    <p style="float: left;">Copyrighted 2012 by <a href="{{{WebAddress}}}/">Your Company</a>
	<p style="float: right;">Running on a flat CMS server!</p>
</footer>
<script type="text/javascript">
window.PageName = "{{{PageName}}}";
</script>
Test Site
Flat File System CMS
         Pages


                 Flat CMS


        Blog


         News


         About
Side Bar
服务器使用Handlebar模板中不带扩展名的名称来加载这些部件以进行扩展。例如,在需要放置 socialmedia.html 部分的任何位置,您可以将宏 {{{socialmedia}}} 放置在那里。此外,这些部分可以是 HTML、Markdown 或服务器可以处理的任何其他格式。在我将要制作的服务器中,支持的文件类型是 HTML、Jade/Amber 和 Markdown。我将在实际的服务器创建教程中详细介绍这些细节。
网站的所有页面都将放置在pages目录中。现在,创建以下文件及其内容:
Flat CMS Test Site
This is the Main page of the test site.
### Flat CMS Server

This is a page about the flat CMS server.
### About

This would be a standard about page.
这些是该网站的演示页面。唯一需要的文件是 main.html,因为服务器会将此页面内容加载到内存中并从内存中提供服务。这有助于加快网站首页的加载速度。另外两个页面具有 md 扩展名,因为它们采用 Markdown 格式。服务器将在嵌入页面布局之前将内容转换为 HTML。
一般来说,页面包含的信息不会随着时间的推移而发生太大变化。它们向浏览者提供有关网站、其目的和目标的信息。
通过使用页面创建目录和子目录,页面本质上可以是分层的。这些目录名称创建这些页面目录的地址。
与页面不同,帖子是定期添加的项目,例如每日/每周/每月的博客帖子和新闻项目。预计该区域会经常发生变化。在 posts 目录中,创建两个新目录:blogs 和 news。在每个目录中,创建一个目录flatcms。其中将包含Flat CMS网站的博客文章和新闻项目。
在posts/blogs/flatcms目录中,创建以下文件:
h3 Flat CMS Blog

p This is a rambling blog about a flat CMS.

mixin article($title, $link, $excerpt, $date)
	div.entry
		div.tutorial_wrap
			div.tutorial_div
				a[href=$link]
					h3 #{$title}
				h5 #{$date}
				p.tutorial_excerpt #{$excerpt}
	div.clear

+article("Flat CMS Running", "/posts/blogs/flatcms/flatcms", "Flat CMS Test Server is Running!", "August 12, 2015")
The New Server is Running
----

After much work and programming, the flat CMS server is running.  Stay tuned for more news!

{{{socialmedia}}}
index.amber 是一个 Jade 模板,用于定义博客中的不同帖子。 Jade HTML 模板系统可以轻松添加具有精确格式的新内容。宏的参数组成了不同的项目。您可以在 Tuts+ 上找到有关 Jade 的更多信息。
这里使用的扩展名是amber,因为Jade的Go语言等价物是Amber。因为那是我开始的地方,所以我就是这么做的。如果您想更改扩展名,请记住在适当的服务器代码中也进行更改。
在posts/news/flatcms目录中,创建以下文件:
h3 Flat CMS News

p Here is where all the news about what I am doing is found. Please come back often to check it out!

mixin article($title, $link, $excerpt, $date)
	div.entry
		div.tutorial_wrap
			div.tutorial_div
				a[href=$link]
					h3 #{$title}
				h5 #{$date}
				p.tutorial_excerpt #{$excerpt}
	div.clear

+article("Flat CMS is Running", "/posts/news/flatcms/flatcms", "The Flat CMS Test Server is Running!", "August 12, 2015")
The New Server is Running
----

After much work and programming, I finally have everything moved over to a goPress server that I wrote myself. I will be making this available for you too. Stay tuned!

{{{socialmedia}}}
这将为演示站点创建新闻项目。在我的网站中,我对教程和代码演示页面使用相同的结构。
所有网站都有图片。在此设置中,所有图片都位于 site/images 目录中。对于此演示网站,此处仅放置社交媒体图标。您可以从下载文件中获取图像文件。
即使使用了布局CSS和样式CSS,有时您也需要特殊的CSS规则。 site/css 目录包含对网站进行最后修饰的所有 css 文件。所有layout、styling和site/css文件将一起编译成一个css文件。因此,创建 site/css/final 目录来放置此编译文件。现在,使用以下内容创建 site/css/site.css 文件:
.clear {
  clear: both;
  height: 0px;
}
这里没有太多内容——只是 clear 类的定义。您可以添加您想要的内容,但它应该不属于布局或样式类别。
site/js 目录包含该站点的所有特殊 JavaScript 文件。这些将被编译在一起并最小化,以加快站点加载速度。现在,为已编译的脚本创建 site/js/final 目录和包含以下内容的 site/js/01-site.js 文件:
;
//
// File:         Site.js
//
// Description:   The JavaScript file for the site.
//
jQuery(document).ready(function () {
	//
	// Code here will be ran once a page is loaded.
	//
});
现在这里还没有太多东西。但是,由于您的网站需要自定义 JavaScript,因此可以将其放置在这里。
由于脚本将被一起编译,因此我按照加载所需的顺序对它们进行编号。将脚本一起编译的例程将按数字顺序加载它们。
加快网页加载速度的最简单方法是尽可能减少 HTTP 请求。因此,最好将所有 CSS 和 JavaScript 文件合并为一个文件。编译这些文件的最佳方法是使用构建脚本。每次服务器收到请求时都执行它会浪费处理时间。
我选择的自动化脚本运行器是Gulp。 Gulp 在 Node.js 上运行。因此,请访问 Node.js 网站并下载适合您系统的程序。安装 Node.js 后,您可以使用以下命令安装 Gulp:
npm install --global gulp
npm install --global gulp
npm install --global gulp-compass
npm install --global gulp-autoprefixer
npm install --global gulp-compressor
npm install --global gulp-concat
这将安装我在构建脚本中使用的所有 Gulp 和 Gulp 模块。现在,在目录顶部创建包含以下内容的 gulpfile.js 文件:
// Requirements
var gulp = require('gulp'),
	 compass = require('gulp-compass'),
	 prefix = require('gulp-autoprefixer'),
	 compressor = require('gulp-compressor'),
	 concat = require('gulp-concat');

// Defines path to sass
var Theme = "Basic";
var Layout = "SingleCol";
var themesassRoot = 'themes/styling/' + Theme;
var layoutsassRoot = 'themes/layouts/' + Layout;

// Gulp task
gulp.task('theme-compass-to-css', function(){
	return gulp.src(themesassRoot+'/sass/Basic.scss')
			 .pipe(compass({
                config_file: themesassRoot + '/config.rb',
                css: themesassRoot + '/css',
                sass: themesassRoot + '/sass',
                require: 'sassy-buttons'
                }))
			 .pipe(prefix("last 3 versions"))
			 .pipe(gulp.dest(themesassRoot + '/css'))
});

gulp.task('layout-compass-to-css', function(){
	return gulp.src(layoutsassRoot+'/sass/base.scss')
			 .pipe(compass({
                config_file: layoutsassRoot + '/config.rb',
                css: layoutsassRoot + '/css',
                sass: layoutsassRoot + '/sass',
                require: 'susy'
                }))
			 .pipe(prefix("last 3 versions"))
			 .pipe(gulp.dest(layoutsassRoot + '/css'))
});

gulp.task('watch-compass', function(){
	// What to watch
	gulp.watch(themesassRoot + '/sass/Basic.scss', function(){
		// What to run
		gulp.run('theme-compass-to-css');
	});
	gulp.watch(layoutsassRoot + '/sass/Basic.scss', function(){
		// What to run
		gulp.run('layout-compass-to-css');
	});
});

gulp.task('all-compass', ['theme-compass-to-css', 'layout-compass-to-css']);

// js compressor
gulp.task('js', function () {
    gulp.src([ layoutsassRoot +'/js/*.js', themesassRoot + '/js/*.js', 'site/js/*.js'])
        .pipe(compressor())
        .pipe(concat("final.js"))
        .pipe(gulp.dest('site/js/final'));
});

// css compressor
gulp.task('css', ['all-compass'], function () {
    gulp.src([layoutsassRoot +'/css/*.css', themesassRoot + '/css/*.css', 'site/css/*.css'])
        .pipe(compressor())
        .pipe(concat("final.css"))
        .pipe(gulp.dest('site/css/final'));
});

gulp.task('default', ['all-compass', 'js', 'css']);
这会将所有 CSS 和 JavaScript 编译到一个文件中:CSS 位于 site/css/final/final.css 文件中,以及 site/js/ JavaScript 的 Final/final.js 文件。它还将为 CSS 添加浏览器前缀规则。只需在顶层目录中运行命令:
gulp
Gulp 将编译我们的所有文件并将它们保留在正确的位置。 gulpfile.js 中定义的每个任务都可以通过在 gulp 命令后指定任务名称来单独运行。您可以在 Tuts+ 上了解有关 Gulp 的更多信息。
所有服务器都需要配置信息。因此,在目录的根目录中,使用以下信息创建文件 server.json:
{
    "CurrentLayout": "SingleCol",
    "CurrentStyling": "Basic",
    "ServerAddress": "localhost:8080",
    "SiteTitle": "Flat CMS Test Site",
    "Sitebase": "./site/",
    "TemplatBase": "./themes/",
    "Cache": false,
    "MainBase": ""
}
这个json文件描述了有关要使用的布局、要使用的样式、服务器应该侦听的地址和端口、带有副标题的站点的主名称、缓存的信息用于打开和关闭缓存以进行调试的标志,以及用于站点的不同目录的位置。通过在 json 文件中向服务器提供此信息,服务器可以变得灵活,并减少硬编码信息。
大多数人使用 FTP 客户端将文件复制到服务器。这很容易做到,但根据所使用的系统和程序差异很大。但还有一些替代方案。
您可以设置 Dropbox 守护程序来从 Dropbox 帐户加载您的网站。 Dropbox Wiki 站点有详细的设置说明。唯一的问题是,当您进行任何更改时,文件会自动上传到服务器。有时,您可能希望在不访问服务器的情况下进行更改。如果是这种情况,请为所有网站文件提供一个非 Dropbox 位置以及一个 Dropbox 位置。完成后,在 Gulp 文件中创建一个任务,将新网站文件复制到 Dropbox 位置。
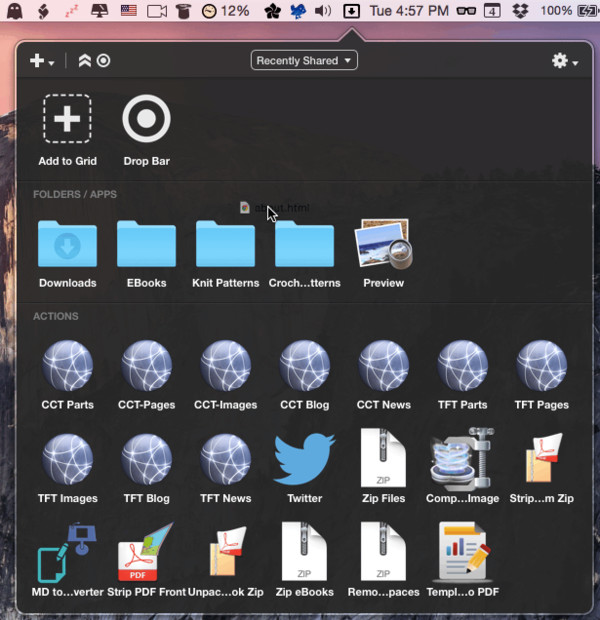
我的首选方法是使用 Dropzone 3。您可以使用 Ruby 或 Python 对 Dropzone 3 进行编程,以对拖放到其上的文件执行任何类型的操作。它还具有许多内置功能。有一个内置的文件操作用于上传到 FTP/SFTP 站点。我为网站上的每个主目录创建一个 Dropzone 3 目标。然后,当我想要更改或添加文件时,只需将其拖动到适当的目录 dropzone 目标即可。您可以通过我的教程“编写 Dropzone 3 操作”了解有关 Dropzone 3 的更多信息。
这些基本文件将创建一个如下所示的网站:

这仅仅是开始!现在,网站结构已经布置完毕,是时候开始构建 Web 服务器了。请和我一起学习下一个教程,我将为此演示网站构建一个基于 Go 语言 的 Web 服务器。
