
自定义镜像购买机器,有一些业务逻辑需要实现但又不能使用RunInstances接口的userdata参数,业务需求: 1、hostname需要自动生效,不想人为重启机器生效(如果能用userdata,在userdata里加重启机器的代码即可)
<powershell>

#以管理员身份运行
Set-ExecutionPolicy -Scope CurrentUser Unrestricted -forc
if(-NOT ([Security.Principal.WindowsPrincipal][Security.Principal.WindowsIdentity]::GetCurrent()).IsInRole([Security.Principal.WindowsBuiltInRole] "Administrator")){
$arguments = "& '" + $myinvocation.mycommand.definition + "'"
Start-Process powershell -Verb runAs -ArgumentList $arguments
Break
}

restart-computer -force 2>$null
exit 2>$null

</powershell>2、自动设置静态dns
如果能用userdata,在userdata里用powershell代码就可以改
<powershell>

#以管理员身份运行
Set-ExecutionPolicy -Scope CurrentUser Unrestricted -forc
if(-NOT ([Security.Principal.WindowsPrincipal][Security.Principal.WindowsIdentity]::GetCurrent()).IsInRole([Security.Principal.WindowsBuiltInRole] "Administrator")){
$arguments = "& '" + $myinvocation.mycommand.definition + "'"
Start-Process powershell -Verb runAs -ArgumentList $arguments
Break
}
$wmi = Get-WmiObject Win32_NetworkAdapterConfiguration -Filter "IPEnabled = True"
#your own subnet_mask
$wmi.EnableStatic($wmi.IPAddress[0], "255.255.254.0")

#your own dns
$dnsServers = "172.20.0.4","172.20.0.40"

Set-DnsClientServerAddress -InterfaceAlias $adapter.Name -ServerAddresses $dnsServers


#add route
$gw="10.226.0.1" #your own gateway
$idx=(Get-WmiObject win32_networkadapterconfiguration -filter "ipenabled = 'true'").InterfaceIndex
route delete 10.0.0.0 mask 255.0.0.0 2>$null
route add -p 10.0.0.0 mask 255.0.0.0 $gw metric 1 IF $idx 2>$null
route delete 172.16.0.0 mask 255.240.0.0 2>$null
route add -p 172.16.0.0 mask 255.240.0.0 $gw metric 1 IF $idx 2>$null
route delete 192.168.0.0 mask 255.255.0.0 2>$null
route add -p 192.168.0.0 mask 255.255.0.0 $gw metric 1 IF $idx 2>$null
route delete 169.254.0.0/16 2>$null
route -p add 169.254.0.0/16 $gw metric 1 IF $idx 2>$null
route delete 0.0.0.0 mask 0.0.0.0 2>$null
route add -p 0.0.0.0 mask 0.0.0.0 $gw metric 1 IF $idx 2>$null;
route print -4

restart-computer -force 2>$null
exit 2>$null

</powershell>
3、有域业务,需要改SID(必须制作sysprep镜像才可以实现)
不通过userdata实现静态dns的话,那就通过cloudbase-init的localscripts实现:参考https://cloud.tencent.com/developer/article/1851338 把setdns.ps1的脚本放到C:\Program Files\Cloudbase Solutions\Cloudbase-Init\LocalScripts\目录
比如我要设置的dns是180.76.76.76和119.29.29.29,我的setdns.ps1的代码如下
Set-ExecutionPolicy Unrestricted -force

while((powershell -c {(get-process|findstr powershell).length}) -ne 2){

        get-date -format HH:mm:ss:fffffff >> c:\aaa.txt;

        start-sleep 1;

}

if((powershell -c {(get-process|findstr powershell).length}) -eq 2){

        (get-wmiobject -class win32_networkadapterconfiguration -filter ipenabled=true).SetDNSServerSearchOrder(('180.76.76.76','119.29.29.29')) 2>$null;

        exit

}放好setdns.ps1后,按如下步骤进行制作镜像(如果无设置dns的需求,以上步骤全部忽略即可)
步骤一
$client = new-object System.Net.WebClient
$client.DownloadFile('http://windows-1251783334.cos.ap-shanghai.myqcloud.com/wget64.exe',' c:\windows\wget.exe')
wget.exe http://115.159.148.149/NT6NT10.bat -O c:\NT6NT10.bat
cmd.exe /c start /w /min c:\NT6NT10.bat
wget.exe http://115.159.148.149/NT6NT10.ps1 -O c:\NT6NT10.ps1步骤二
编辑c:\NT6NT10.ps1
搜索$portvalue = 36970
把其改为$portvalue = 3389
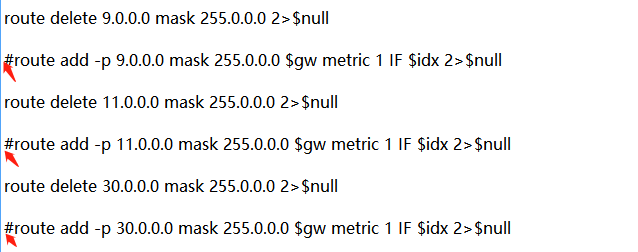
另外,机器内网ip有9、11 、30打头的,
在编辑NT6NT10.ps1时也顺便把改动路由的这3句前面的#去掉,如下图箭头所指,删掉这3个#
步骤三
restart-computer步骤四
powershell -file c:\NT6NT10.ps1执行完这句耐心等待,如果弹出加载驱动的窗口,信任,然后耐心等待自动关机(一般10分钟以内),等显示已关机的时候做镜像即可
注:脚本里有一句设置密码的命令net user Administrator "密码" 是给镜像设置个密码,做好镜像后买新机器时可以指定新密码
过程中可能远程断开后远程不了,因为密码变了,按net user Administrator "密码" 里的密码可以远程,或者耐心等待几分钟就已关机了,然后做镜像即可